Painting is a project almost anyone can do. The only problem is it can take forever if you aren’t an experienced painter. I have found a few tips and techniques over the years and learned how to paint without tape and paint faster. If you don’t have to tape off edges and can cut in faster the process can go from taking weeks to paint a house to days.
Painting Prep Work
You can’t paint a room and have it look good without doing the prep work. This step is time-consuming but makes a big impact on the finished job.
-
Remove everything from the walls.
- Outlet covers
- Thermostats – There may be some wires sticking out but as long as you can work around it that shouldn’t be a problem
- Smoke detectors
- Pictures
- Nails and screws
-
Clean dirty or greasy walls.
- A simple wipe down with some soap and water should be good or a degreaser if it is a kitchen and really greasy. I don’t always wash down a whole wall just make sure to get noticeable spots and any cobwebs hanging out. Dirt, cobwebs, and greasy can cause the paint not to stick as well or cause bumps in the paint.
-
Fill all holes.
- You can use spackling or regular drywall. Sometimes these can shrink and not fill well. I recommend a 45-min compound. It is cheap, dries fast (only mix a small amount), and is strong once dried.
- A few tips for this step.
- Use the back of a 5 in 1 painters tool to indent nail or screw holes. The top of the drywall where the nail or screw went in can be damaged. Filling and not indenting can cause bumps. Indenting creates a hole to fill and there won’t be any loose edges popped up to ruin the smooth wall.
- When using a 45-minute compound mix up a small amount until it is the consistency of toothpaste. Put a small amount on the putty knife and fill the hole. Holding the putty knife at almost 90 degrees wipe off the extra. Only a little sanding should be required after this.
- If filling in a larger dent put less pressure and use less of an angle with the putty knife to leave more compound on the wall to fill the dent. If there is still an indent after your first pass you can always mix up a little more and fill it again. Filling larger areas can take a little practice but if you make a mistake you can always sand things down and try again.
- Sand and put a light coat of primer over patched spots before painting. Some people go right to painting after using the 45-minute compound. I have never tried it so I can’t say if it works but just to be safe I always lightly brush on a thin coat of primer. A thin coat dries within a few minutes and I can start painting.
-
Sand lightly before primer or paint.
- This isn’t back-breaking sanding work just a quick pass to get any rough spots and smooth down the surface before painting. There is a radius360 sanding tool I like. It is large and round and works great for quick sanding before and between coats of paint and primer. Regular sand pole sander works well too but if you are going for quicker get a radius360.
After the walls are prepped it’s time to start painting.
Painting Inside Corners
These are the ceilings, inside corners, and trim, where the colors change and precision is important.
This can be time-consuming. It used to take me hours between taping and painting for this part and with mixed results. After flipping a house and painting for weeks I started looking for faster ways. There is so much advice online I tried several different methods before finding one that worked great and helped me paint faster with better results and no tape.
Paint edges and corners before rolling. The roller covers up most brush strokes when you cut in first. The wall will look more consistent and smooth after.
Always do two coats of paint. This ensures excellent coverage and even texture. True one coat may cover well but for best results, two coats are generally preferred. If you choose to only do one coat get the best quality paint you can afford.
-
Get a good quality 2″-3″ angled brush.
- Wooster 2″ angled brush is the one I prefer. Some people don’t like the short handle I find it gives me more control.

Wooster 2″ angled brush is my favorite
- Wooster 2″ angled brush is the one I prefer. Some people don’t like the short handle I find it gives me more control.
-
Don’t paint from a full can of paint.
- I like painter’s cups with a handle. You can pick up one from amazon or any hardware store. The ones I get are red and they come in a larger or smaller size. Both sizes are easier than dealing with a full can of paint.
-
Put about an inch of paint in the bottom of the cup.
- Don’t go over this amount you are going to be dipping your brush in and hitting the bottom to fill up the brush. Too much paint and there will be a mess everywhere.
-
Dip your paintbrush to the bottom of the cup several times to fill the brush.
- This puts paint on all edges and inside the middle of the brush.
-
Wipe all four edges of the brush on the side of the cup.
- It feels like you are putting paint on a brush to take it off but there is still paint in the middle of the brush. You want to be painting from the center of the brush and the other bristles don’t have paint dripping all over and lets you get closer without pushing paint on the ceiling or trim.
-
Start a couple of inches down and put some paint on the wall.
- After there is paint on the wall put the heel (short end of the angles brush) on the wall and apply a little pressure.
- Place the rest of the brush on the wall so the top of the angle fans out a little. Make sure to use light pressure when fanning out the bristles. In the picture, you can see the brush is not smashed into the wall just slightly fanned out.
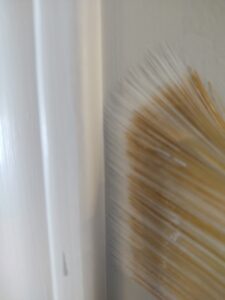
- Use long and as straight of strokes as possible until running out of paint. If you notice paint starting to build up and you are pushing paint stop. Pick up your brush and spread out the paint. Without paint loaded up on the outside bristles, it is easier to control where the paint is going and less likely to get smudged on a ceiling or trim.
- Use the outside bristles as a guide. They can lightly touch the edge you are painting along and are less likely to get paint where you don’t want it since those bristles aren’t loaded with paint.
-
For the first coat paint near the edge but leave about 1/8 to 1/16th of an inch gap.
- This will be filled in on the second coat. The first coat goes quicker this way, less likely to make mistakes when running along the edge only once and the next coat will cover the gap.
- Leaving a small gap can really reduce the time it takes to paint. Instead of spending time trying to perfect your edge twice you only have to do it once.
-
When doing the final coat follow all the same steps but instead of leaving the gap go right to the edge.
- Let the outside bristles just barely touch the corner and move the brush along as straight as possible.
When two walls meet and will be the same color paint with the brush about two inches out from each side of the corner. This ensures there is plenty of room for the roller to get in without damaging the other wall.
Get around any outlets. I like to use half-circle sweeping strokes and go out a few inches with the brush from any outlet or hard to reach area for the roller. Spread the paint out making sure there are no drips.
Painting an Outside Edge With a color change
Doing an accent wall or changing colors for a different room it can be hard to keep the edge a straight line. Bristles get on the other wall spreading paint, rollers push paint on the other wall when used on a corner. It ends up a back and forth of touching up colors and the result is usually a wavy line.
Here are a few tips for better lines on an outside corner.
- Don’t use a roller for the corner it can push paint to the other side.
- I use the same method of filling my brush as when I do the inside corners. I fill the middle and take it off the edges.
- Use the brush and put paint on the wall leaving about half an inch between the corner and paint.
- Once most of the paint is off the brush and onto the wall hold your brush so the bristles are almost perpendicular to the edge. Start with the short end of your brush pushing paint towards the edge and pick up the brush as you get to the edge. This pushes paint to the edge without bristles going over to the other side.
Rolling Paint
Rolling is the fastest part. There are still a few tips to avoid roller marks (lap marks) and for speed.
Get the right equipment.
The roller – Avoid the cheap metal roller the sleeves tend to fall. I like one that is plastic with a ball bearing with metal clips on the end to hold the sleeve on. Occasionally the roller can start to squeak if not cleaned well enough. A decent one can be anywhere from 7$-15$ which isn’t expensive but compared to the 2$-3$ ones it’s pretty pricy.
The sleeves – I like microfiber roller sleeves with 3/8″ to 1/2″ nap. The more nap the more paint the roller will hold which can make the job go faster but roller marks are more likely the larger the nap is. A few tips about the roller sleeves.
There are also wool rollers others recommend and I am sure are fine to sue too just avoid the supper cheap rollers. They don’t hold enough paint or compress easily making the paint job uneven.
- Wash the sleeve before use. Get it wet scrub a little then put on the roller and spin to get the extra moisture out. This gets rid of all the little lint that comes off to ruin the paint job.
- You can also use tape around the sleeve. Tape the whole thing and then remove the tape pulling off any loose material. You may need to repeat this a couple of times to get everything off.
- If having trouble with roller marks get a sleeve with a beveled edge or simply cut the sleeve on one end at an angle. This helps paint from accumulating on the edge and leaving roller marks.
Extension Pole – This is just the pole that connects to the roller. It makes life much easier and you can reach the entire length of the wall.
Rolling Paint on The Wall
I have seen lots of different ways of putting paint on the wall with a roller. The one I like the best is to load the roller with paint and start towards the top. Make sure to use the extension pole to be able to reach almost to the top of the wall. Let gravity roll the roller down to almost the bottom and then apply light pressure to roll it up to the top again.
Go about two roller lengths out and then go back over the section you just did.
Tip – Don’t let your roller dry out. In hot dry conditions paint can dry fast so work quickly and keep your roller about half loaded. Do an entire wall at a time don’t take a break. You want the paint to remain wet to avoid marks when putting wet paint over partially dried paint.
Cover as much of the brushed on paint as possible with the roller to get an even texture. Stay about 1/2″ away from corners so the adjacent wall doesn’t get marks.
After that simply load the roller up again and start another section. Make sure to overlap the sections and move along as quickly as possible. Some paints dry fast and if you go over paint when it is starting to dry it can peel up, cause lap marks, or have a different sheen when finished.
Roller Tips
- If you are concerned about brush marks in the corners where a regular roller doesn’t fit get a smaller 4″ roller. These can get in the corner closer and make brush strokes less visible.
- The end that connects to the handle is where the most pressure is applied. This is the end that tends to leave marks. If you are working around a sensitive area use the end that isn’t directly connected to the roller. With less pressure on that end, it tends to be more forgiving and you will end up with a smoother finish.
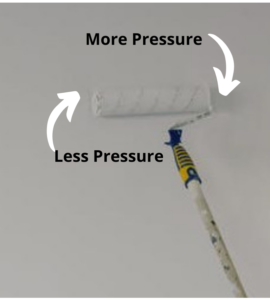
- Face the end of the roller that is directly connected away from the already painted area when overlapping. Any roller marks will be smoothed out as you continue to paint and not left on the already painted surface.
Sanding
Sand quickly between every coat. Get a sanding pad that is round and connects to a painting pole and run it over the walls.
Sand before painting and between every coat. It will remove any dust or bumps. Most people skip this step but for the smoothest most even textured walls don’t skip this.
Summary
- Sand before priming or painting and in between all coats.
- Cut in the edges, corners, and around trim before rolling.
- Roll an entire wall at one time to keep a wet edge.
- Work quickly to avoid painting over partially dried paint.
If you are interested in other painting projects checkout this cabinet painting article.
This technique helped me paint faster and get better results. I usually do most of the painting when flipping houses and with a little practice, this has saved me time and improved my work.
Let me know in the comments if you try this technique and if it works for you.
If there are any painting tips you regularly use I would love to hear about them. Leave a comment and let me know.